What is an InstaStory Face Filter
Back in 2019, Instagram released the option for users to create, use, and share their own filters on InstaStories. If you are familiar with photo sharing apps, you know what a filter is! Filters are camera effects that give the ability to use overlays or color palettes. Many people like using filters to have a similar editing style of video or photo. Instagram’s goal is to keep users in their app, instead of going to third party apps to create aesthetically pleasing content for stories and photos. An InstaStory filter simply allows you to have more aligned, and beautiful, imagery without leaving Instagram. Having a branded aesthetic will lead to having a more engaged instagram audience.
Using a Creator’s Camera Effect
In an effort to combat the loss of users to Snapchat, Instagram introduced stories in August of 2016. This release came with a complete set of filters created by Instagram that users could apply to their stories. People were still using other resources to create story effects, and to make a more in-depth user experience, IG eventually introduced the ability for users to create their own filters through Spark AR.
Find a Filter you Enjoy
However, finding a filter on Instagram is not as easy as you would hope. Much like the lack of search engine power on the app in other areas, filters are not easy to look up. The app has suggested filters in an ‘App Gallery’, but even there, you cannot search for a filter by name or effect style. In order to find an effect you like, you have two options: search the gallery under general genres, or see someone use the filter and save it to your story bar.
Saving the Story Effect
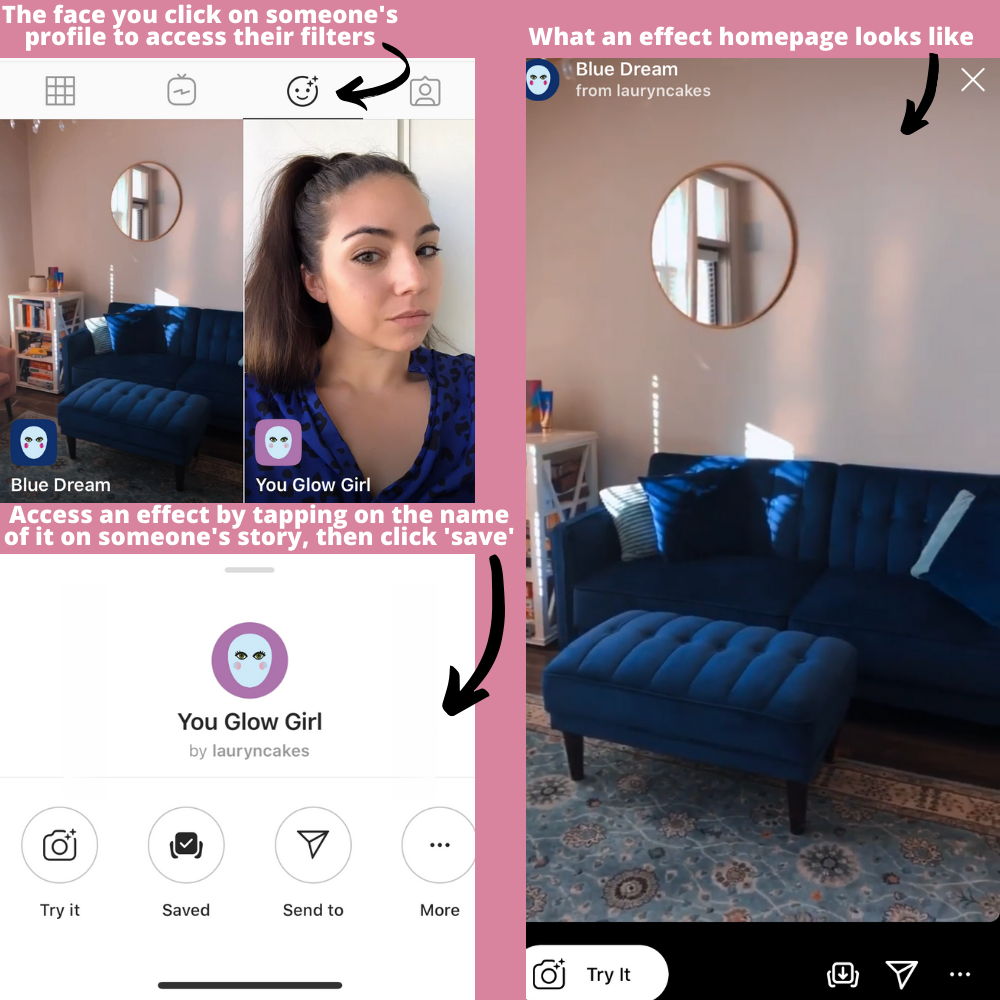
Once you have found a filter you like, things become much easier! If you are seeing the effect on someone’s story, simply click on the name of the filter at the very top right hand corner of the story. This will take you to the filter’s homepage where you can “try it” or “save it”. If you click “save it” it will add the filter to your camera effect roll when you enter your InstaStories and you will never have to look for it again!
Tips for Using Filters
Tap Focal Point to Adjust Highlight
A common mistake that is made when using camera effects on Instagram is allowing the highlights to blowout the image. Story filters are particularly picky when it comes to lighting, and it’s important that you adjust this before applying the effect. To do so, make sure the effect is saved, go to your stories, and tap on the main focus of your image. If this is your face, you will want to tap on the lightest part (the highlight) of your face. This will adjust the lighting and shadows so that the white balance isn’t “blowing out” your face and shows more details. Once this is done, toggle to the filter you want to use! It should be noted that once you are on the filter, you cannot adjust these focus highlights by tapping, but the highlights may change themselves if you are doing video with various degrees of lighting.
Find Natural Lighting
Furthermore, lighting is everything! Most filters are made to work best in natural lighting, aka the sun. If you are near an indoor light source, it will most likely add an orange tint to the filters. Try to story near a natural light source instead.
Tag the Creator to be Featured
A common misconception is that the creator of the filter can see who uses it. Unfortunately, the only way for a filter artist to see who is using their work is if they are physically tagged (typing out their name with an @ symbol in front) on the story. Otherwise, their name is listed at the top of your story next to the filter name, but no notification is sent their way. However, creators can see backend analytics of the reach and impressions on their filters and their use daily, weekly, or monthly. If you want me to reshare you using one of my filters, be sure to tag @lauryncakes on your story!


Stephanie
February 19, 2020Love learning more about face filters. If only I had the skill to make one myself – but I will say that there are SO many others that I love – including yours! It’s the perfect filter for a no-makeup day or when I just wanna look a little “enhanced.” Hehe! So fun!
Kileen
February 19, 2020This post was so informative! I’ve always wondered how face filters work!!
Kileen
cute & little
Nataly
February 19, 2020I have really been enjoying all the filters that Instagram has now! It makes making stories so much more fun! Thanks for sharing all your tips babe.
Ashley R
February 19, 2020I hardly ever use these because i can never remember. They are fun. Some of the ones celebrities make are really funny.
Jennifer
February 19, 2020Natural lighting is so key for me! But I’m glad the filters are there to help. I normally end up using one!
Azanique Rawl
February 20, 2020This is so helpful! I haven’t used all the new filters as much because I get OVERWHELMED with options. Thanks for breaking it down 🙂
-xo, Azanique | https://www.lotsofsass.com
Whitney
February 26, 2020I never knew you could adjust the face filters! So cool! Thank you so much for sharing!